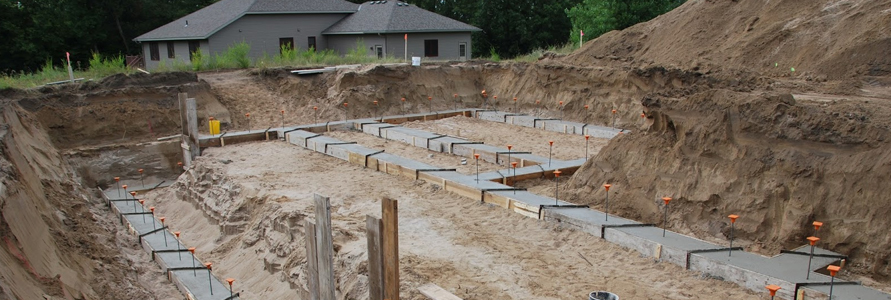
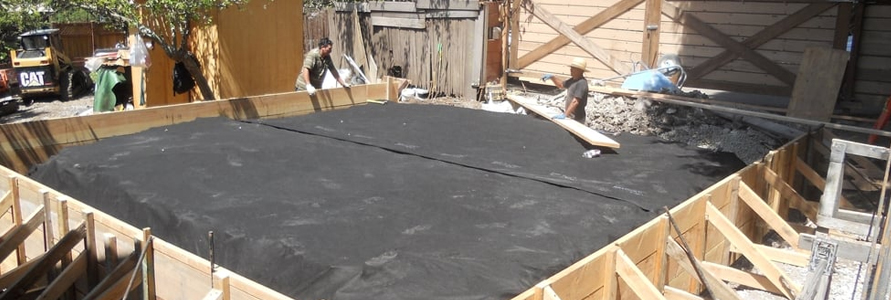
One of the amazing things about Canadian homes is that the huge majority of them are built using completely standardized building practices. One reason for this consistency is a set of uniform building codes that apply across the country. Another reason is cost -- the techniques used to build homes produce reliable housing quickly at a low cost (relatively speaking). If you ever watch any house being built, you will find that it goes through the following steps:

Grading and site preparation

rading-and-site-preparation
The first crew on the site handles site preparation. Often, this crew and the foundation crew are the same people, but sometimes not (especially if there are a lot of trees on the lot). Houses are generally built on a foundation that is either a basement, a crawl space or a slab. The site-preparation crew typically arrives on the site with a backhoe and/or bulldozer. The crew's job is to clear the site of any trees, rocks and debris, level the site if necessary and dig as necessary for the foundation being built.

Foundation construction

foundation-construction
The foundations of the building transfer the weight of the building to the ground. While 'foundation' is a general word, normally, every building has a number of individual foundations. Most buildings have some kind of foundation structure directly below every major column, so as to transfer the column loads directly to the ground.

Since the weight of the building rests on the soil (or rock), engineers have to study the properties of the soil very carefully to ensure that it can carry the loads imposed by the building. It is common for engineers to determine the safe bearing capacity of the soil after such study. As the name suggests, this is the amount of weight per unit area the soil can bear. For example, the safe bearing capacity(SBC) at a location could be 20 T/m2, or tonnes per square metre. This figure is the maximum the soil can bear, so an engineer will take pains to see that her design does not exceed this figure in any part of the building.

Framing

framing
Framing, in construction known as light frame construction, is a building technique based around structural members, usually called studs, which provide a stable frame to which interior and exterior wall coverings are attached, and covered by a roof comprising horizontal ceiling joists and sloping rafters (together forming a truss structure) or manufactured pre-fabricated roof trusses—all of which are covered by various sheathing materials to give weather resistance.

Modern light-frame structures usually gain strength from rigid panels (plywood and plywood-like composites such as oriented strand board) used to form all or part of wall sections, but until recently carpenters employed various forms of diagonal bracing (called "wind braces") to stabilize walls. Diagonal bracing remains a vital interior part of many roof systems, and in-wall wind braces are required by building codes in many municipalities
  • Balloon framing
    Balloon framing is a method of wood construction used primarily in Scandinavia, Canada and the United States (up until the mid-1950s). It utilizes long continuous framing members (studs) that run from sill to eave line with intermediate floor structures nailed to them, with the heights of window sills, headers and next floor height marked out on the studs with a storey pole. Once popular when long lumber was plentiful, balloon framing has been largely replaced by platform framing.
  • Platform framing
    Platform is a light-frame construction system and the most common method of constructing the frame for houses and small apartment buildings as well as some small commercial buildings in Canada and the United States. The framed structure sits atop a concrete (most common) or treated wood foundation. A sill plate is anchored, usually with "J" bolts to the foundation wall. Generally these plates must be pressure treated to keep from rotting. The bottom of the sill plate is raised a minimum 6 inches (150 mm) above the finished grade by the foundation.

Windows and doors

windows-doors
Fixed windows
This is the simplest type of window. It cannot be opened or closed, which makes it the most weather-proof of windows

Casement windows
A casement window is one that is hinged on its side, and normally opens outwards rather than inwards. This makes it very easy to operate. Since it opens outwards, it cannot be used in some situations, such as when the window opens out into a corridor, as it will block movement. These windows are designed to resist rain and wind from the outside in, so their direction cannot be reversed.

Sliding windows
A sliding window moves within its own plane. These may require effort to move them back and forth, and so may not be best suited for use by the elderly. A disadvantage of sliding windows is that they cannot be opened fully, in the sense that there is always a fraction of the window that is closed. Most often, this fraction will be one half, one third, or one quarter.

Single hung windows (vertically sliding)
A hung window is one that slides vertically. A single hung window has one fixed pane and one sliding shutter. The fixed pane is typically above the sliding shutter, so only the bottom half is openable. These are similar to sliding windows in that a fraction of the window is not open to the outside

Double hung windows (vertically sliding)
A double hung window has two sliding shutters, one above the other. Either the top or bottom half can be opened. Such windows are not very common, as it is unusual to want the top half of the window to be opened. The term hung windows is common in the United States; these are called sash windows in Europe. A sash is a frame, usually filled in with glass, that forms the moving part of the window. The fixed part is the window frame.

Awning windows or ventilators
An awning window is hinged on its top edge, so that it opens upwards and out. These are also called ventilators. An awning window can be difficult to operate, especially if it is heavy. These require stays to keep them open; their weight naturally forces them to close.

Pivoting windows
A pivoting window rotates on a vertical axis, which is usually placed in the exact centre of the window, so that the window is properly balanced. Pivoting windows are sometimes found in old church buildings (in warm climates), as they have windows that are very narrow and tall. These windows are rarely used in residential or office construction in contemporary times. They are unique in the sense that half the window opens inside, and half outside, and the frame of the window has to be designed to accommodate this function.

Doors

Hanging or installing a door isn't as difficult as it may seem. Replacing an existing door is easy if the new door core is the same size. Installing a door in a new par­tition wall is also very easy if you buy a prehung door so you don't have to build the door frame yourself. In fact, you probably can tackle this home improvement project in an hour or two if you have the necessary materials and tools ready.
  • Prehung door
  • Level
  • Cedar shingle shims
  • Hammer
  • 16d­ finishing nails
  • Nail set
  • Wood putty
  • 10d finishing nails
  • Wood sealer

Roofing

roofing
This house uses standard asphalt shingles for the roof. The first step is to cover the roof with building paper (tar paper): The shingles then go on very quickly (on this house, in less than a day)

This vent replaces the triangular "gable-end vents" found in older homes. Ridge vents give better circulation (especially when cathedral ceilings are used) and also prevent bats and squirrels from getting into the attic. aluminum flashing that keeps water away from the walls at the points where the shingles touch the walls.At the edge of the roof, the shingles are cut off with about 2 inches of overhang:

Underlayment

underlayment
  • PERMAT PERMAT is an innovative uncoupling underlayment that offers all the labor saving benefits of the old plastic roll systems..
  • SECURMAT SECURMAT is a tear-proof rolled uncoupling underlayment that provides a secure bonding surface for ceramic tile and...
  • AQUA SHIELD AQUA SHIELD is a waterproofing fabric that can be applied with thinset to most surfaces that are dry, flat and structurally...
  • AQUA SHIELD SET AQUA SHIELD SET includes all products needed to water proof a standard size shower .
  • ULTRA-DRAIN ULTRA-DRAIN is the first drain mat system that can be installed without a thick mortar bed and offers all the stress.
  • DRAIN-MAT DRAIN-Mat provides a durable, prefabricated drain system to prevent the accumulation of moisture that can form...

Trim

trim
The finish materials in a building, such as moldings applied around openings (window trim, door trim) or at the floor and ceiling of rooms (baseboard, cornice, and other moldings). Also, the physical work of installing interior doors and interior woodwork, to include all handrails, guardrails, stair way balustrades, mantles, light boxes, base, door casings, cabinets, countertops, shelves, window sills and aprons, etc. ExteriorThe finish materials on the exterior a building, such as moldings applied around openings (window trim, door trim), siding, windows, exterior doors, attic vents, crawl space vents, shutters, etc. Also, the physical work of installing these materials

Painting

painting
Painting exteriors can seem like an immense task. "How am I going to get paint all the way up there?" you might be asking. "And in the sun?" However, exterior painting is not as difficult as you might think, provided you know the right steps to speed the process along.
  • Identifying Paint Problems If you're trying to fix old painting flaws, you should make sure you know what caused them in the first place.
  • Removing Old Paint Sometimes it isn't enough to paint over the existing finish. Learn how to get rid of old paint jobs quickly and safely.
  • Exterior Painting Preparation Gutters leak. Siding cracks. Light fixtures blocks your way. Take inventory of all the little chores that need to be looked after before you can pop open that can of paint.
  • Washing Exteriors You always want a clean surface to work with when painting. Here's some advice on how to give yourself a dirt-free surface as your canvas.
  • Resetting Popped Nails Over time, nails can come loose or rust. Put those nails back in their place with these instructions.
  • Covering Shrubs Foliage can get in the way of work outside, but you don't have to chop them down. Keep your outdoor plants protected with these tips.
  • Painting Siding Get down to the nitty-gritty of painting your house with this article, which lays out the best way to get started.
  • Painting Exterior Trim It's hard to be speedy when fixing up the trim of your house, but these suggestions can make the process zip along.

Siding

siding

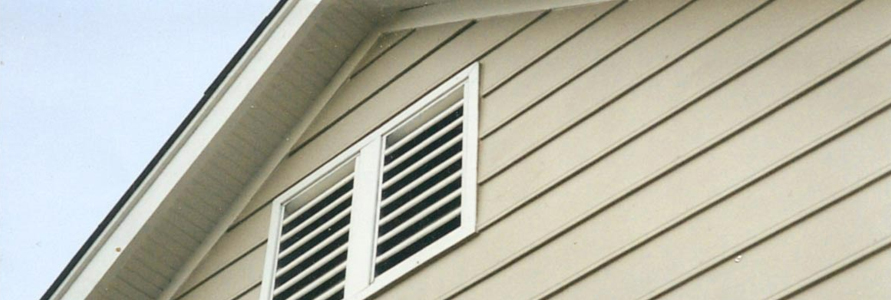
The house uses standard vinyl siding. The siding is made from thin, flexible sheets of plastic about 2 millimeters thick, pre-colored and bent into shape during manufacturing. The sheets are 12 feet long and about a foot high. You start at the bottom and the sheets interlock into each other as you go up.

The area extending out from the house under the roof is known as the soffit (parallel to the roof). The fascia boards are perpendicular to the roof. The soffit is perforated so that air can flow into the attic and up through the ridge vents to ventilate the attic. In this shot, part of the soffit is in place, while part is awaiting installation. Note that all exposed fascia wood is capped with a sheet of painted aluminum that was bent into shape on the site:

Electrical

electrical
How power gets from the power plant to your house. The purpose of the electrical system in a house is to distribute the power safely to all of the different rooms and appliances. The electrician for this house first placed all of the boxes for electrical outlets, lights and switches.
Then he ran wires from the fuse box to each box and between boxes. Here's what the fuse box looked like once he got done. Wires were first run through to the boxes. A lot of drilling is necessary, both down into the crawl space and up into the ceiling, as well as through studs to run wires between boxes: Wires are then pulled through the boxes, clipped and capped:

Insulation

Insulation

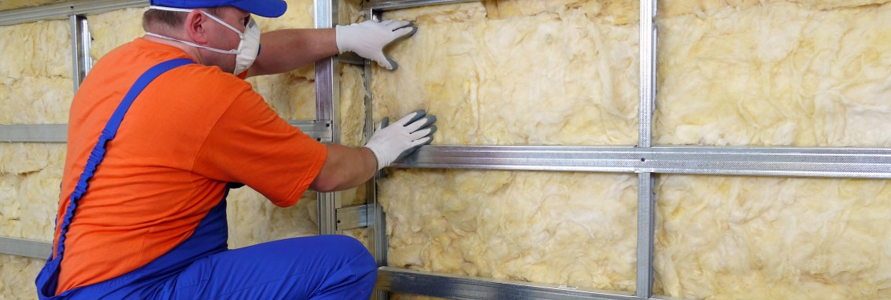
The purpose of insulation is to lower the heating and cooling costs for the house by limiting heat transfer through the walls and the ceiling. The insulation process starts by installing foam channels in the eaves:

These channels guarantee that air will be able to flow from the soffit vents to the ridge vents. Without these channels, insulation tends to expand into the eaves and block the soffit vents. This house uses standard fiberglass insulation throughout.

Notice that over the insulation is a thin plastic vapor barrier. The idea behind the vapor barrier is to keep moisture that develops inside the house inside. Without the barrier, here is what happens inside the wall in winter: Warm, moist air moves through the drywall and into the insulated wall cavity; at some point inside the cavity it becomes cold enough for the moisture to condense, soaking the insulation. The vapor barrier prevents this process. In older homes, the siding and sheathing were so loose that air easily migrated out before the moisture condensed, but that is no longer the case so the barrier is essential.

Drywall

drywall

Installing drywall can be easy, but taping the joints between panels requires some practice. Some do-it-yourselfers install the drywall themselves, then call an experienced drywall taper to finish the job.

Although it's easy to figure how much drywall to buy (just compute the square footage of the walls and ceiling), it takes some planning to end up with as few joints as possible.­ The standard-size sheets for walls measure 4 X 8 feet. They are usually installed with the long side running from floor to ceiling, but if you can eliminate a joint by placing them horizontally, do so. All drywall sheets are 4 feet wide, but many building-material outlets offer 10-foot and even 12-foot lengths. The most popular thicknesses of drywall are 1/2 inch (walls) and 5/8 inch (ceilings), but check your local building code for requirements

  • Step 1: Construct a pair of T-braces from 2 X 4s about an inch longer than the distance from floor to ceiling. Nail 2 X 4s about 3 feet long to one end of each longer 2 X 4 to form the Ts. Alternately, adjustable T-braces can be rented.
  • Step 2: Cut drywall panels to size. Use a sharp utility knife along a straightedge to cut drywall. After you make the cut through the face paper, place the board over a length of 2 X 4 laid flat on the floor, or some other type of support, and snap the scored section down. The gypsum core will break along the line you cut. Then turn the panel over, cut the paper on the other side, and smooth the rough edges with very coarse sandpaper on a sanding block.
  • Step 3: Install drywall panels on the ceiling. If possible, try to span the entire width with a single sheet of wallboard to reduce the number of joints.Position and wedge the T-braces against the drywall sheet to hold it in place until you finish nailing it.
  • Step 4: Drive nails at 6-inch intervals into all the joists covered by the sheet. Start in the center of the drywall panel and work out. Give each nail an extra hammer blow to dimple the surface slightly without breaking the face paper.
  • Step 5: When the ceiling is finished, cut and install wall panels. Carefully measure for any cutouts in the drywall, including electrical outlets, switches, or light fixtures. To make cutouts, draw a pattern of the cutout on the wallboard, drill a hole on the pattern line, and then use a keyhole saw to follow the pattern.
  • Step 6: Space the nails 6 inches apart along studs, but start nailing 4 inches from the ceiling. Butt the wall panels against the ceiling sheets. Dimple all nails. Nail metal outside cornerbeads to cover any outside corners.

Plumbing

plumbing
As with all construction trades, plumbing's tasks fit into the broad categories of rough work and finish work. Construction professionals describe projects as progressing in phases and plumbing's rough and finish phases loosely coincide with the rough and finish phases of other trades, such as carpentry and electrical. For example, a carpenter's framing remains exposed during the rough carpentry phase, allowing other trades to complete rough phases by routing components through the wall's cavities. Whether you're working on a plumbing project or supervising plumbers, an understanding of the plumber's timeline allows you to follow and understand standard practices.

The term "finish plumbing" typically refers to work that occurs after interior finishing, such as drywall or plaster. During the finish plumbing phase, plumbers remove the caps on drain and water supply pipes and install undersink drain assemblies, water supply valves and water supply lines. Additionally, plumbers connect drain and water supply lines to plumbing fixtures, such as sinks, toilets and tubs. Other tasks performed during the finish phase include caulking and sealing around plumbing fixtures and testing new connections.

Finish Plumbing Tools and Materials
In addition to the tools used for rough plumbing, finish plumbing requires tools that twist and tighten drain assemblies, water supply components and plumbing fixture parts. Common finish plumbing tools include various wrenches, such as box wrenches, pipe wrenches and adjustable wrenches. Additionally, plumbers carry a comprehensive set of screwdrivers and other general purpose tools to complete finish plumbing tasks.

Carpet and flooring

carpet-flooring
How slippery or smooth it is; do not use very smooth finishes in bathrooms and balconies How abrasion resistant it is - do not use soft, quick wearing finishes in areas with heavy foot traffic. Marble and wood have low abrasion resistance, for example, and granite and cement tiles have high abrasion resistance. Whether it is chemically neutral - some finishes react with acids, and should not be used in kitchens The climate: wood and carpets are perceived to be warm, so use them in cold climates, and stone and tile are perceived to be cool, so use them in warm climates - unless you have underfloor heating or cooling, which changes things.
    Types of Flooring
  • Wood Laminate Flooring Get the wood look for less with wood Laminate flooring. Laminate is scratch-resistant, durable, won’t fade in sunlight, and resists stains. Manufactured in the U.S.A, Laminate comes wide plank, hand scraped, traditional oak, Brazilian cherry, grey wood options and more. Wood Laminate Flooring.
  • Solid Hardwood Flooring Made from a single piece of wood, Solid Hardwood flooring is the most sought-after flooring. Solid Hardwood elevates your home's value and can last for many years when cared for properly. Choose from a variety of stains, plank sizes, species, and finishes. Solid Hardwood Flooring.
  • Engineered Hardwood Flooring Engineered Hardwood flooring is real wood made to be installed in rooms where solid wood cannot. Stronger than Solid wood, Engineered Hardwood is less likely to expand or shrink from humidity changes. Available in a variety of stains, plank sizes, species, and finishes. Engineered Hardwood Flooring.
  • Luxury Vinyl Plank Flooring Get the wood look on a budget with Vinyl Plank flooring. Combine the realistic wood grain patterns, coloring, and textures with durable stain, scratch, slip, water, and mildew resistance. Vinyl Plank flooring is built to stand up to the busiest of households. Vinyl Plank Flooring.
  • Sheet Vinyl Flooring Now more stylish than ever, Sheet Vinyl Flooring gives you a real stone or wood look with resistance to stains, scratches, moisture, and mildew. Practical and budget-friendly, Sheet Vinyl flooring is structurally sound and remarkably easy to clean. Sheet Vinyl Flooring.

Kitchen counters

kitchen-counters

The kitchen countertop is the perfect place to add the ultimate design touch to your kitchen. Regardless of which kitchen countertop ideas you’re attracted to, select materials that are durable and built to withstand the wear and tear associated with cooking and prep.

Engineering and technology have made a wide variety of design choices and finishes possible. While most of the following kitchen countertop ideas are durable, it’s a good idea to always work with cutting boards and silicone trivets for hot pots. Keep countertop surfaces clean with a non-abrasive, soft towel and follow manufacturer or installation guidelines on what products to use to clean and maintain the beauty of your countertops for years.